Showing posts with label Seven Years War. Show all posts

Tuesday, July 20, 2021

Column Assaults during the Seven Years War: Myth or Reality?


Dear Reader,

Today, I want to discuss the idea of columnar assaults during the Seven Years War. This is a somewhat controversial topic, as it is usually asserted that attacks by columns were not a feature of the Seven Years War period, but only appeared with the advent of Revolutionary/Napoleonic Warfare. There is no question: during this later period, troops used a greater variety of column formations at the battalion, regimental, and division level.  However, this post demonstrates that the Austrians did attack in columnar formations during the Seven Years War. These formations were not only "march formations" which took the unit to the battlefield, but used within musket range of the enemy troops. 

This post does not look at the most often cited example of a attack in column during the Seven Years War: the abortive French infantry attack at Rossbach. This is a clearly unintentional use of the column, born out of dire necessity. Likewise, I do not tap into the extensive theoretical debate regarding the use of columns from Folard on. Rather, in this post, I look at battles where the commanders made a conscious decision to engage enemy forces, whether in column or not.  At the battles of Moys, Hochkirch, Maxen, and Landeshut, the Austrians used a variety of successive linear and column formations in order to approach and attack the enemy positions.[1] At Adelsbach, the Prussians did the same. In each of these situations, circumstances and the terrain conspired to make attacking in a deep formation the most effective way of combating the enemy.  At Moys, Hochkirch, and Maxen, the Austrians attacked on a battalion frontage: what we might call battalion columns, or successive linear waves. At Landeshut, a single Austrian Grenadier battalion attacked in a column of companies. At Adelsbach, the terrain forced the Prussian troops to approach the enemy position in a column. 

At Moys in 1757, Christopher Duffy has clearly demonstrated that the Austrians employed a successive linear attack.[2] The Austrians arrayed their battalions in seven "columns" of three battalions each, separated by 100 yards. Within each "column" the battalions had 200 yard intervals between them. This allowed for flexibility, as the orders explained: "if a first-line battalion suffers heavy losses, or falls into disorder, we will file it off to the left or right, and replace it with the battalion behind."[3] This columnar, or successive linear assault would form a model for the Austrians during the war, as they attacked using columns with a battalion frontage again at Hochkirch and Maxen. 

At Hochkirch, the novel method of approach and attack meant that different officers had immediate tactical control of sectors of the battlefield, thus, some of the attacking "columns" formed into line of battle earlier, while others persisted in a columnar formation.[4] The Austrian veteran Cognazzio asserts that this was altogether too much to ask of the troops, and that his component division within his battalion was a mongrel force of collected men: "Grenadiers, Fusiliers, Hungarians, and Germans... [I] placed them together in rank and file, and brought the line into being."[5] Cognazzio asserts that in the heat of the fight, flexibility was the only thing that allowed for the creation of a "well-closed line."[6] So, at least in some instances, it seems that the columns of Hochkirch were intended to deliver men to the area of action, rather than a formation by which to actually conduct an attack. 

At Maxen in 1759, the situation is rather different. Here, the depth of the "battalion columns" of the Austrians was significantly increased to twelve battalions. Led to the attack by the grenadiers of the army, two Austrian battalion columns approached the enemy positions. The Austrian official report cites that they were greatly supported by an artillery bombardment, and seeing that: "Such a swift, sustained, and well-placed fire had caused great damage to the enemy lines, and that they were beginning to waver, the assault was allowed to go forward. It happened that the infantry were in battalion columns."[7] The same source continues, asserting that the battalion columns were not formed into a wider battle line until the Prussian position on the heights was broken.[8] 

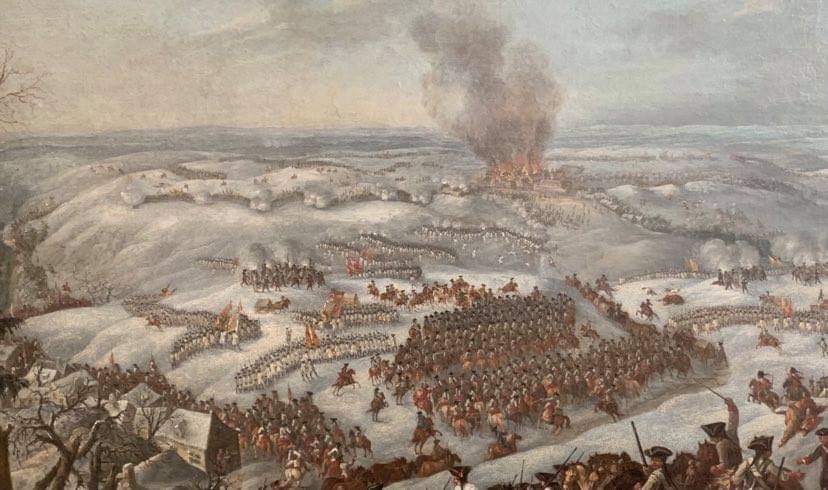
Detail from, The Attack at Maxen, by Franz Paul Findenigg

Historians should use visual sources, even those painted closely after events, with extreme care when reconstructing battles. The Attack at Maxen, painted immediately after the battle by Franz Paul Findenigg, displays some features worthy of note. First: Findenigg correctly identifies the first two battalions approaching the Prussians as grenadiers (they have peaked caps, and carry no flags, while the other battalions all carry flags and wear cocked hats).  Findenigg also depicts the action of the battery disrupting the Prussians, as well as Austrian battalions in a "succcessive line" or "battalion column" formation, stacked several units deep. The individual battalions of the column seem much closer than the guidelines of the attack at Moys, perhaps supporting Christopher Duffy's assertion that "Austrian column[s] of assault" were formed in a dense closed-up formation.[9] We should not put too much weight on this visual evidence. Thus, while presenting the same issues as other visual sources, Findenigg's painting, at least, seems to support the idea that the Austrians made their initial breakthrough of the Prussian line using this formation. 


The attack on the Kirchberg at Landeshut, 1760 (circle added)
Detail from Jaeger's Plans von Zwey un Vierzig Haupt Schlachten

At Landeshut in 1760, we find something rather different. Here, two Grenadier battalions led the attack on Prussian fixed positions on the Mummelberg and Buchberg. The grenadier battalion of Major de Vins employed a column of companies for this assault. [10] Having taken these two positions and been returned to order, a larger force of infantry now combined into two "columns" and launched an, "assault of columns" against the Prussian position on the Kirchberg. As opposed to a column of companies, this attack, especially considering the way it is depicted on the map (three lines) was likely a successive linear wave attack as at Moys.[11] 

The Prussian approach at Adelsbach,
Raspe, Plan von der Affaire ... am 6. July 1762 bey Adelsbach,


The Prussian use of columns in the attack at Adelsbach on July 6th 1762 appears to have been largely unintentional. Attempting to get at the Austrian position, the Prussians had to march down a valley, through Ober Adelsbach, over the stream, and back up a valley to the heights where the Austrians were waiting for them. As a result, they were unable to properly form for the attack, and came on in some sort of marching column, likely of open platoons. The Prince de Ligne noted that the Prussians were marching to the attack, "dû défilér," indicating a formation narrower than a line.[12]  Upon reaching the height, however they attempted form a more traditional battle line. [13] This is was not, therefore, an intentional attack in a column, but one mandated by the terrain. 

Conclusions

In the Seven Years War, then you have a variety of columnar attacks. In order to assist with visualization, I have snapped some photos below. These attacks are made with a variety of successive linear or column formations. The first employed, and most clearly described is the attack a "column" of three battalions deployed in line, with significant intervals. 

The successive linear attack ,as at Moys 

Second, we have the assault in battalion columns, as happened at Maxen. Intervals are still present, though intentionally or unintentionally, they have been reduced. 

The column of battalions attack as at Maxen

Third, we have the single battalion attacking in a column of companies, as at Landeshut.  This attack was likely designed to take a fixed position. 

The column of companies attack as at Landeshut

Last, and honestly least, we have the bumbling and unintentional attack by marching columns, as occurred at Adelsbach. 

A Prussian column of march by platoons, opened. 

Thus, during the Seven Years War, the Austrian army did attack in a columnar formation. These attacks were less varied, less coordinated, and more ad-hoc than later Revolutionary and Napoleonic attacks in column.  Despite this, the evidence is clear: the Austrians did indeed innovate with alternative linear and columnar attacks during the Seven Years War, not just in theory, but actually on the battlefield. This may have been unintentional: a feature of the novel Austrian grand tactics of the time. Innovation is sometimes unintentional.  By the time the Seven Years War had ended, the Austrians had attacked in successive linear waves, columns of battalions, and a battalion column of companies. 

If you enjoyed this post, or any of our other posts, please consider liking us on facebook, or following us on twitterConsider checking out our exclusive content on Patreon. Finally, we are dedicated to keeping Kabinettskriege ad-free. In order to assist with this, please consider supporting us via the donate button in the upper right-hand corner of the page. As always:

Thanks for Reading, 


Alex Burns

------------------------------------------------------------------------------------------------------
[1] In using the language of a "successive linear" attack, I have followed the convention of Paddy Griffith, Battle Tactics of the Civil War, 151-152. 
[2] Duffy, Prussia's Glory, 97. 
[3] Quoted in Prussia's Glory, 97. 
[4] Duffy, By Force of Arms, 129-143.
[5] Jakob Cognazzio, Geständnisse eines Oesterreichischen Veterans, (1790) Volume 3, 47. 
[6] Ibid, 48. 
[7] J. G. Tielcke, Beytraege zur kriegs-kunst und Geschichte des Krieges, (1775) Volume 1, 30. 
[8] Ibid, 31. 
[9] Duffy, Instrument of War, 405. 
[10] Duffy, By Force of Arms, 233. 
[11] Johann Christian Jaeger, Plans von Zwey un Vierzig Haupt Schlachten, Treffen, und Belagerungen, (1790)  124-125. 
[12] Prince de Ligne, Melanges militaires, litteraires, et sentimentaires, (1796) Volume 16, 124.
[13]Gabriel Nicolaus Raspe, Plan von der Affaire ... am 6. July 1762 bey Adelsbach, legend entry E. 


Thursday, August 20, 2020

260th Anniversary of the Battle of Strehla (Gefecht bei Oschatz)


View from the Dürrenberg to the southeast, where the vast majority of the
Reichsarmee remained as a fixing force.

Today is the 260th anniversary of the Battle of Strehla (Gefect bei Oschatz), during the Seven Years War in German Central Europe. A small battle by the standards of the European Seven Years War, with perhaps just under 40,000 men on the battlefield, it is larger than any of the battles of the American War of Independence. Fought in the electorate of Saxony, allied forces attempted to use their large numerical superiority to force the occupying Prussian army to abandon a good defensive position on the river Elbe. I had the good fortune to be able to walk this battlefield in 2018, in the summer just a few weeks before the battle's anniversary.

A (not breath-takingly accuarte) period map of Strehla
In this battle, the 67 year-old Prussian Lt. General, Johann Dietrich von Hülsen was attacked by an Austrian and Reichsarmee force under the command of Karl Friedrich Graf von Pfalz Zweibrücken-Birkenfeld.[1] At this battle, the allied Austrians and Reichsarmee numbered between 25,000 to 30,000 men, and faced a Prussian Army of 10,000 to 12,000 men.[2]

Hülsen deployed his soldiers on two sets of rising ground near the small town of Strehla, with his main army in a defensive camp by the town, and a detached force of grenadiers and artillery further west from the river on the high ground north of the village of Clanzschwitz. In this battle, the Austrians would ignore Hülsen's main camp, and focus their efforts on the relatively isolated grenadiers.

The view from Prussian positions at the Dürrenberg, towards Gausco's Austrian
Grenadiers. The village of Clanzschwitz is in shadow

Attempting an attack by multiple columns, the allies surrounded Hülsen's isolated advanced post at the Dürrenberg, where Major General Braun stood with 4-5 battalions of Prussian Grenadiers. Tying up the Austrian Grenadiers from the south with an artillery duel, Braun shifted his forces move towards a large hill with a windmill to the west, just as FML. Kleefeld's detachment of five battalions broke out of woods directly to Braun's north. Shifting his battalions to meet this more immediate threat, Braun benefited from the relative inactivity of Austrian forces to his west and south, who continued to engage his forces in an artillery duel, but did not launch heavy attacks. FML Kreefeld's force engaged the Prussian grenadiers in a close range firefight.

Looking north from the Dürrenberg, to where the Austrians under Kleefeld would
have emerged. 
At this point, Hülsen, realizing the danger, immediately moved the Schorlemer Dragoons across the battlefield, riding between the dueling Austrian and Prussian artillery, to attack the flank of Kleefeld's corps. Eventually, these troops were bailed out by Austrian cuirassier, but not before the dragoons had broken up the attack, with the support of the grenadiers already engaged. The battle ended with a cavalry fight on the north end of the battlefield above the village of Laas, where Colonel Kleist, having redeployed to face a large body of allied cavalry, pushed these forces back, ending the battle. 


A view of the northern cavalry battlefield on the flat ground northwest of the
village of Laas
In a sharp fight lasting only two hours, the Prussians had defeated an enemy force that outnumbered them over two to one. The Prussians suffered approximately 1,000 killed and wounded, the allies suffered 1,800 killed and wounded, and 1,200 prisoners lost to the Prussians.[3] Realizing that discretion was the better part of valor, Hülsen withdrew to the stronger defensive position at Torgau the same day, delaying the allied advance for a month from that position.

The battle shows fighting typical of the middle stages of the Seven Years War. The Austrians, impressed by their success at Hochkirch, continue to employ the  method of moving independent columns to partially surround the enemy before attacking. Likewise, Austrian and higher quality Reichsarmee troops are used for actual combat operations, while the majority of the Reichsarmee is used to fix the enemy in place. In the actual battle, the difficulties in coordinating simultaneous independent assaults because evident, as the Prussians manage to fix enemy columns in place with long-range artillery duels. All in all, Hülsen, Braun, and Kleist performed quite well in the face of superior enemy forces.

If you enjoyed this post, or any of our other posts, please consider liking us on facebook, or following us on twitterConsider checking out our exclusive content on Patreon. Finally, we are dedicated to keeping Kabinettskriege ad-free. In order to assist with this, please consider supporting us via the donate button in the upper right-hand corner of the page. As always:

Thanks for Reading, 


Alex Burns

-------------------------------------------------------------------------------------------------------------
[1] As a complete aside, Friedrich Wilhelm, Freiherr de Steuben (Baron Steuben), likely fought at this battle as a member of Hülsen's staff. Palmer, General von Steuben, 38.
[2] Christopher Duffy, By Force of Arms, 273.
[3] German General Staff, Die Kriege Friedrichs des Großen. Theil 3, Der Siebenjährige Krieg, 1756-1763 Bd. 13, pg. 178.

Monday, May 25, 2020

SYW Wargame Campaign Report: Week 6

Jaeger and Grenzer skirmish in the Bohemian foothils


Dear Reader,

Today, I am reporting on the sixth week of the Seven Years War Campaign which I have been umpiring over the last two months. You can find links to previous weeks at the bottom of the post. Beginning in the middle of March, the campaign is ongoing and still in progress. The period of time for today's post is roughly April 22nd-28th. Below is a map for those dates. As stated before, the campaign switched to a new map to allow for in the inclusion of a few more players.  I have first included the new map, followed by an update from the old map.

The new campaign map for week 6 
In this week, Prussian forces drove the Swedes back in the direction of Stralsund in the far north. In Saxony, Reichsarmee forces were on the retreat, informed that the King of Prussia had arrived in the area. On the Oder/Russian sector, Zieten pulled off an impressive maneuver, covering hundreds of miles in a short period of time with the cavalry of his army and General Huelsen's army, riding from the Oder to Saxony and back without his absence being reported to the enemy. General Tchernychev returned to Russian positions around Schwibus, and launched another raid on the enemy.  In Silesia, Austrian forces confronted the small army of the Duke of Bevern, pursuing him from a position around Schweidnitz, and running unexpectedly into Frederick and Bevern's combined force around Landshut.  Sieges proceeded at Glatz and Schweidnitz.  In a rare bit of good fortune, no major tabletop battles were fought in this week, and the umpire breathed a large sigh of relief. 

The Old Campaign Map for Week

In the north, no major battles were fought, and the Swedish commander pulled his forces back from Anklam, and holed up inside Stralsund with his army and supporting naval squadron. Generals Mantueffel and Dohna constructed a fortified camp outside of Stralsund, attempted to blockade the position from the landward side. General Dohna also sent out several raiding forces, in an effort to collect funds for the ongoing war effort.

In the Russian theater of war, General Buturlin waited fairly patiently for the arrival of reinforcements under the command of both Generals Saltykov and Rumyantsev, who had been redeployed from areas where they were going to cooperate with the Austrian Army. General Tchernychev returned from his first raiding expedition, and departed on his second raid. General Zieten, growing nervous that the quiet Russians in his front boded poorly for other theaters, rode from the Oder river near Gruenberg to Muska in Saxony in under a week, to date the fastest redeployment of troops during this campaign. Zieten met with Frederick briefly in Saxony, and turned his forces back towards the Russian position.

In Saxony, the arrival of the King sent the Austrians into a hasty retreated.  Prince August Ferdinand (Henri's successor) marched south, reuniting his army with the forces under FM Keith in Dresden. Prince A.F. than turned over his command to Keith, the senior officer. During the same period, General d' Kavallerie Serbelloni took his force to the southwest, crossing the Elbe at Meissen, and linking up with forces under the command of General Hadik near Chemnitz.

In Silesia, the Austrians pursued a siege at Glatz, really blockading the city, while dispatching most of their force north towards Schweidnitz. Aggressively maneuvering from the area of Glatz, the armies of Daun and Loudon approached the entrenched camp of the Duke of Bevern. The umpire lovingly spent 4 hours finding period maps of this location for a potential conflict, only to have the ungrateful Duke of Bevern withdraw immediately before the vastly superior enemy forces.

A report to the Duke of Bevern on his defensive position near Schweidnitz
(from a 1736 map)
Bevern, ever canny, moved his forces to the northwest, and then sharply cut to the south, bringing his army into a position near Hirschberg. The Austrians initially let him go, and pursued a siege at Schweidnitz.

An Austrian progress report from the Siege of Schweidnitz
 Frederick's force, moving a great rate of speed from Saxony, met Bevern near Hirschberg. Together,  they immediately moved in the direction of Schweidnitz, via Landshut. Since the Prussian Royal Army had left Breslau over two weeks earlier, the Austrians had been unaware of its position. Worrying that Bevern might be threatening their communications, the hot-tempered Ernst Gideon von Loudon took his force from Schweidnitz, ignoring a directive from General Neipperg, and moved to Landshut.

The Austrian forces under Loudon near Landshut

On the evening of April 28th, both the Prussian forces and the Austrians became aware of the enemy to their front. The combined armies of Frederick and Bevern numbered 70,000 men, while the forces under Loudon were much smaller, in the neighborhood of 30,000 men. Realizing the danger that his forces were in, Loudon immediately ordered his troops into defensive positions, and awaited the Prussian onslaught.

Everything hung in the balance. The arrival of the King's Army had temporarily restored their situation in Saxony, new field commanders had driven the Swedes back to Stralsund in the north, and in Silesia, all things pointed to a massive victory over Loudon. Tune in next week, as the Prussians began their most daring operational maneuver of the war to date. 

Background and Week 1

Week 2

Week 3

Week 4

Week 5

If you enjoyed this post, or any of our other posts, please consider liking us on facebook, or following us on twitterConsider checking out our exclusive content on Patreon. Finally, we are dedicated to keeping Kabinettskriege ad-free. In order to assist with this, please consider supporting us via the donate button in the upper right-hand corner of the page. As always:

Thanks for Reading, 


Alex Burns


Monday, May 18, 2020

SYW Wargame Campaign Report: Week 5

Prinz Henri leads his men against Reichsarmee troops in the village of Rittschen


Dear Reader,

Today, I am reporting on the fifth week of the Seven Years War Campaign which I have been umpiring over the last two months. You can find links to previous weeks at the bottom of the post. Beginning in the middle of March, the campaign is ongoing and still in progress. The period of time for today's post is roughly April 15th-21st. Below is a map for those dates. As stated before, the campaign switched to a new map in this week, to allow for in the inclusion of a few more players.  I have first included the new map, followed by an update from the old map.

Here is the new map:
The new map, with generalize locations and movements
Here is the old map:


This was an interesting week, with many developments. In the far north, (the Pomeranian theater of war) the Swedes launched an offensive from Stralsund. Prussian Generals Dohna and Manteuffel were dispatched to take control of forces in this area, but would not arrive until the following week. 
In the northwest of the old map, the Austrians scored their first clear victory over the Prussians at Rittschen (although the Austrians would also like to remind you that they view the Battle of Swiet, in week 4, as a victory). 

The Russians launched a raiding force under Generral Tchernychev, who managed to bridge the Oder and avoid detection with his 5,000 men. Frederick turned from a march south from the Oder/Russian theater of war to the west, hoping to rescue the situation in Saxony. In the south,  one of the more brilliant marches of the campaign occurred. The Duke of Bevern, realizing that he was nearly trapped by Austrian forces, abandoned the city of Königgrätz, having collected a substantial contribution. As in previous weeks, we will start in the north and work our way south. 

Week 5: The Pomeranian Sector
In the Pomeranian theater, the Swedes under General Gustaf Hamilton launched an offensive, driving the ill-led Prussian Army back from the gates of Stralsund to Stettin. Having driven back the Prussian army, Hamilton began a siege of the city of Anklam, opening a parallel and a few batteries. 

The progress of the siege of Anklam
The Prussian commanders arriving in the region would soon attempt to rectify this state of affairs. Moving to the south, the Saxon/Silesian theater of war, on the new map: 

The Saxon/Silesian Theater of War (New Map)
And on the old map: 

Week 5: The Saxon/Silesian Sector (Old Map)
The main event of Week 5 in the Saxon/Lower Silesian sector was the Battle of Rittschen. After a few days of waiting, Prinz Henri, the brother of Prussian King Frederick the Great, launched an attack on the enemy. Prinz Henri, (a rather famous wargame designer), felt that his tactical acumen would be sufficient to overcome the slightly larger Reichsarmee force commanded by Gen d' Kav, Serbelloni. Serbelloni, historically, a lover a sweet drinks, Italian poetry, and beautiful women, calmly sipped his hot chocolate and awaited the Prussian advance. 

If last week's confrontation at Predmeritz was my favorite period of operational maneuvering in the campaign to date, the fight at Rittschen would have to be my favorite battle. Both players were experienced wargamers, and led their troops with appropriate confidence and panache.

The Prussian Columns cross a branch of the Spree, approaching the Austrian position
Henri got his army into position to attack by 8am, leading one column of marching troops himself. The Reichs-Executions Armee, expecting an attack directly from the north, were caught off balance, and quickly redeployed their men into the hedged fields facing Henri's chosen angle of attack. 

The Prussian Army deploys as the Reichsarmee scrambles into defensive positions
Henri, confident of victory, ordered a general advance across the entire line. The battlefield was crowded, and the Prussian cavalry did not have room to fully deploy according to Henri's initial disposition. 

The Prussian attack begins
In his disposition, Henri had called for the guns to arrive last, and so the battle began with an advance of the Prussian first line of infantry. On the Prussian left, their cavalry engaged the Reichsarmee horse, and drove them a considerable distance. The infantry advance was difficult initially, with a poor morale throw causing a Prussian musketeer battalion to falter. 

Prinz Henri attempts to rally his men, and directs his Grenadiers to charge
Henri directed his sole Grenadier battalion to attack the enemy flank and rear. 

The Prussian grenadiers clear the defensive works
This charge was devastating, causing two of the circle regiments of the Reichsarmnee to flee in disorder. The Prussian cavalry followed up this advance, fighting with their opposite numbers again, and driving them a considerable distance. At this point in the battle, Serbelloni was rather nervous, as his initial defensive positions had been pried out of his grasp. 


At this point, though, expecting better results, Prinz Henri ordered his second line infantry to assault the village. Placing himself in direct command of these troops, he led his men forward. 


A Prussian veteran of the encounter described the scene:
"Leading by example, the prince placed himself at the head of the first battalion of Frei Infanterie to hand, and led them in an assault on the village. Fired by his example, the men begin general attack on all fronts. Our men stormed forward, approaching a battery of 12pders on the village street. The phrases “Blutgasse” and “Hochkirch” flashed into my mind with no apparent cause. The Prince stretched himself into his stirrups, looking every inch of his 5’3” frame. Henri shouted, at the top of his slightly high-pitched voice, 'Kerls, wollt ihr ewig leben?!!'”
As the Prince and his men approached the enemy battery, the 12pders fired. 

The fatal moment at Rittschen
Henri and approximately 200 of his men were immediately down, hit by canister. The Prussian forces reeled from this news, sparking retreats across the battlefield. 

The Prussians break from the field at Rittschen
With the loss of their leader, the Prussian forces abandoned the fight, leaving Serbelloni the master of the field. Prinz Henri, informed of the seriousness of his wounds, replied that it was quite alright, he had some grading to do and could use a break. 

Somewhat stunned by this news, Serbelloni wrote this hasty note, scrawled on the back of some unfortunte Swabian, to Vienna: 

------------------------------------
"Majesty, 
Your army defeated Prinz Heinrich von Preusse this 15th of April 1758.  It was a hard fought afternoon.  The Prussians lost 5500 men including 2000 prisoners taken.  Our forces were battered by 2500.  Thanks be to God and the stout hearts of Your Majesties valiant troops. 
We hear the King of Prussia is moving this way.  Rumor has it He and 70,000 could be in Gorlitz on the 20th.  I hope this means FM von Daun is hounding him out of Siliesia. 

Your Majesty's most humble servant, 
J.B. Graf Serbelloni, 
Gen-d-Kav"

-----------------------------------

Turning back to the campaign at large, the King of Prussia was indeed on his way to Saxony, hastily marching in great strides. The Russians had a quiet week on the whole, and Generals Zieten and Tchernychev attempted to outdo one another in feats of horsemanship in la petite guerre. Tchernychev eventually eluded his pursuers, building a bridge at Beuthen, and crossing the Oder. 

Week 5: The Upper Silesian/Bohemian Sector
In the south, the Austrians, having completed their victorious siege of Neisse, moved their main army towards Königgrätz. The Army under Loudon resumed its operations, approaching Königgrätz from the west. Rather than become trapped by these forces, the Duke of Bevern marched at a furious pace directly to the north, abandoning the city and heading for Trautenau. He escaped a Maxenish fate by a day. 

The campaign seemed to be turning against the Prussians. With the army of the King moving between theaters, the Prussians had been defeated in Saxony, placed on the back foot in Pomerania, and driven out of Bohemia. All in all, the Swedes and Austrians had a successful week (and who can forget the valiant Russian sacrifices which made this all possible). Tune in next week, as the Austrians begin ambitious sieges at both Glatz and Schweidnitz, the Swedish General Hamilton faces new opponents in the north, and Frederick arrives in Saxony. 

Background and Week 1

Week 2

Week 3

Week 4

If you enjoyed this post, or any of our other posts, please consider liking us on facebook, or following us on twitterConsider checking out our exclusive content on Patreon. Finally, we are dedicated to keeping Kabinettskriege ad-free. In order to assist with this, please consider supporting us via the donate button in the upper right-hand corner of the page. As always:

Thanks for Reading, 


Alex Burns


Tuesday, May 12, 2020

SYW Wargame Campaign Report: Week 4

The climax of the Battle of Predmeritz

Dear Reader,

Today, I am reporting on the fourth week of the Seven Years War Campaign which I have been umpiring over the last two months. You can find links to previous weeks at the bottom of the post. Beginning in the middle of March, the campaign is ongoing and still in progress. The period of time for today's post is roughly April 8th-14th. Below is a map for those dates.

Week 4 Map (April 8th-April 14th) 
Here is a brief summary for this week. Prinz Henri of Prussia and Gen d' Cav Serbelloni maneuvered close to one another in the northwest, in Saxony. In the north, Frederick moved south towards Breslau, reaching the town after a week of movement. Both the Russians and General Ziethen's army (left by Frederick in the north) eyed one another warily with little movement. In the south, Lacy and his raiding party returned to Neisse. In an active siege, the defenders of Fort Preussen at Neisse detonated two globes de compression, there was an ill-conceived attempt by the Neisse garrison leading to high casualties and prisoners, and finally, an Austrian assault which took the city, leading the garrison commander at Ft. Preussen to consider surrender. Finally, Prussian forces under the Duke of Bevern clashed with a small Austrian army commanded by Loudon at Königgrätz.

Close-up of the Northern Theater
In the North, Prinz Henri moved his army down towards Bautzen via Cottbus. Gen d'Cav Serbelloni moved across the Goerlitz, and then proceeded north to Rittschen on the road to Cottbus, fortifying the crossing of the branch of the Spree directly in front of him. Henri and Serbelloni squared off, preparing to fight for control of Saxony.

In the Russian theater, Zieten, the Hussar King, moved his forces back across the Oder, keeping an eye on the Russians at Meseritz, while the Royal Army under Frederick II moved south towards Breslau, reaching Breslau on the 14th of April.


In the southern area of operations, the siege of Neisse was brought to a conclusion. The week opened with the defenders countermining, and detonating two large explosive charges beneath the Austrian approaches. These globes de compression did not kill many enemy soldiers, as a result of the quick actions of FM Neipperg, a man of great experience in the wars, who realized the enemy intention before it was too late.
Tresckow leads the men forward from the Glacis at Fort Preussen

The valiant Prussian commander, Tresckow, next sought to delay the enemy by a sortie, which was conducted on April 10th. This sortie managed to spike a few guns, but cost the Prussians 1,200 casualties, all in all a disastrous result for the garrison. The Austrians assaulted the city on the night of April 13th. Although the wet ditch was not dried, they had spent two weeks cutting sufficient fascines for the creation of a causeway. The defenders of the city were reduced to 800 men, Tresckow having withdrawn most of the men to Fort Preussen. These men were massacred by the Grenzer leading the attack, who then ransacked the city with considerable destruction of property and a small loss of life. The already propogandic press in Berlin could not have hoped for a better outcome. Daun called for Tresckow to surrender Fort Preussen, which he did on April 14th. His men were allowed to march out freely, but had to surrender their arms and cannons.
Briefing received by Bevern, April 8th, at Königgrätz. 

In Bohemia, a different sort of campaign was unfolding. The Duke of Bevern, having occupied  Königgrätz with his light forces for some time, had reached that city with his entire army (approximately 26,000) in the preceding week. Ernst Gideon von Loudon, approaching from Prague with a slightly smaller army of 19,000 men, took up positions on high ground east of the Elbe. In a first for this campaign, both Loudon and Bevern carefully maneuvered in the immediate area of the enemy before committing to battle. This maneuvering lasted for two days, and was one of the most enjoyable portions of the campaign for the umpire to date.

Battle of Predmeritz: Königgrätz is at the bottom of the picture,
Predmeritz is in the center left. 

In the early hours of April 10th, a small body of Austrian forces crossed the river north of the city, were met by Prussian forces, and chased back across the river. This brought on the Battle of Predmeritz an der Elbe, (called Battle of Swiet by the Austrians). The Prussians opened the battle by moving across the river, attacking the village of Predmeritz which was held by enemy infantry. A cavalry battle broiled north of the village, with the Prussians inflicting losses on Austrians cuirassiers who stubbornly refused to quit the field. Loudon had deftly planned to use villages as strongpoints, forcing the enemy to suffer attrition before. attacking his main line.

The view from the east, 11am.  Predmeritz is under heavy attack
by Prussian grenadiers
Eventually, the Cuirassiers were forced to retire beyond Swiet, and the Prussians focused considerable attention on Predmeritz, taking it by noon after an hour and a half of fighting. The Prussians continued their advance, but were wary about moving directly from Königgrätz, as the enemy had cavalry and artillery covering the crossing of the Elbe in that quarter.

2pm: The attack on Swiet begins. Both Bevern and Loudon can be seen in this photo
 At approximately 2pm, the Prussians continued their attack, storming the village of Swiet, which changed hands three times in the course of heavy village fighting. The Duke of Bevern was wary of committing to a full attack with only his forces to the north of Königgrätz, as his men had already taken heavy losses assaulting Predmeritz. Loudon, too, was concerned about redeploying his men to concentrate solely on the battle for Swiet, as the enemy still possessed a corps of 6,000 men in Königgrätz.

Crisis of the Battle: 3pm
The crisis point of the battle arrived when Bevern, unwilling to continue the attack without his 6,000 man reserve from Königgrätz, ordered them to march across the river. This drew a charge from Loudon's remaining cuirassiers, and a countercharge from Bevern's waiting cuirassiers. Both of these charges would draw opportunity fire from batteries in the area. Bevern's horsemen were turned back by the flanking fire from the Austrian hilltop guns, but the fire from the Prussian battery also halted Loudon's 2 remaining squadrons, and the Prussian infantry were able to get across the Elbe in an uncontested movement.

The table at the Austrian decision to withdraw
At this point, Loudon, realizing that Bevern would have the advantage in a continued contest, decided to withdraw his forces. The Austrians had already inflicted 6,000 casualties on the Prussians, suffering over 3,000 of their own, and Loudon believed, correctly, that he had represented the honor of the Queen of Hungary quite well. Loudon's forces withdrew to Chlumetz, to lick their wounds, while the Duke of Bevern immediately sent raiding parties south to reconnoiter the border of Moravia. Both sides would remain in their positions for roughly the next week.

The campaign stood at a vital crossroads. With the addition of more players, the umpire made the decision to change to a larger map, encompassing a greater theater of war (the new map is below). The King of Prussia, having reached Breslau, had to make a critical decision of where to employ his army next. The Austrians, have taken Neisse, were free to choose their next target in the ongoing liberation of Silesia. In Saxony, Prinz Henri and Serbelloni faced off in what was sure to be a bloody encounter. Though victorious, Bevern's Prussian force was increasingly isolated in Bohemia.


Background and Week 1

Week 2

Week 3

If you enjoyed this post, or any of our other posts, please consider liking us on facebook, or following us on twitterConsider checking out our exclusive content on Patreon. Finally, we are dedicated to keeping Kabinettskriege ad-free. In order to assist with this, please consider supporting us via the donate button in the upper right-hand corner of the page. As always:

Thanks for Reading, 


Alex Burns


Tuesday, May 5, 2020

SYW Wargame Campaign Report: Week 3

The massed grenadiers of the King of Prussia at Schwibus
Dear Reader,

Today, I am reporting on the third week of the Seven Years War campaign which I have been umpiring over the past month and a half. You can find links to the previous weeks' at the bottom of the post.  Beginning in the middle of March, the campaign is still in progress now. The period of time covered in today's post is roughly April 1st-7th. Here is the map for those dates. After heavy fighting in the north, and continuing siege operations in the south, additional forces began arriving in Saxony and Bohemia, as an Austrian Army commanded by the Freiherr von Loudon, a Reichs-Execution Armee commanded by Gen d' Kav Serbelloni, and a Prussian Army commanded by Prinz Henri of Prussia appeared on the map.


As in previous weeks, we will be working our way down the map, starting with the northern sector with the Russian armies, and then moving in to the southern sector with the Austrian armies. The signal event on the northern sector of the map occurred on April 1st, as the Prussian and Russian armies clashed again, this time near Schwibus. In this battle, the King of Prussia and the main Prussian Army attacked General Tchernychev and the Russian Army, as reinforcements under Buturlin and Zieten also rushed to the field.

A rare snapshot from the actual campaign map,
rather than one reconstructed after the fact

The situation at the beginning of the battle is visible below, with the approximate front-lines of each force drawn.


 Here is a description of events, taken from the letters of an anonymous Prussian officer at the battle:

8am. The Royal Army under the command of the King of Prussia launched an attack with their best forces, (12,000 grenadiers and guard troops) upon the Russian left flank, which was guarding the road to Bretz. A furious artillery bombardment of approximately 80 guns proceeded this attack. This bombardment succeeded in disorganizing the forces defending the fleches in that sector of the field. On the Russian right flank, a sharp fight began between Prussian dragoons and the dragoons of the enemy, eventually, though the fighting was relatively even, the Russian dragoons withdrew.


9am. The King of Prussia committed his elite troops to the assault of the fleches along the Russian left wing. These troops succeeded in driving off the remaining defenders. Realizing the extreme danger to the left wing, General Tchernychev immediately committed his reserve forces from both wings of the army to the left.

10am. A Russian counterattack, spearheaded by the grenadiers of their army produced uneven results, driving some enemy grenadiers before them, and briefly recapturing the frontline fleches. With the breathing space provided by this attack, General Tchernychev reorganized the left wing, creating a new defensive line. The Russian grenadiers’ counterattack succeeded in taking 1,000 of the Prussian grenadiers as prisoners of war.

11am. Prussian forces resumed their attack, moving a large body of mustketeers from their center to support the attack on the Russian left. They succeeded in badly mauling the new defensive line, but could not break through. General Buturlin arrived on the field in advance of his forces at 11:30am.


12pm. A mass attack by the remaining Prussian grenadiers succeeded in breaking the Russian left, but resulted in the most of these grenadiers becoming casualties. The King of Prussia's grenadiers have paid a fearful cost for this victory. General Buturlin’s forces arrived, and Buturlin immediately committed his Corps d’Observation in order to buy time. The Prussian forces begin to waver.


1pm. Zieten’s forces arrive and begin the attack, saving the king and driving off the enemy. General Tcherychev’s forces succeeded in withdrawing from the field, and with the Corps d’ Observation on the north side of the city of Schwibus in a new defensive line, the Prussians broke off the attack.


Casualties were heavy on both sides, with 17,000 Prussians and 20,000 Russians killed, wounded, or captured in this engagement. The Russians retired in the direction of Meseritz, and established a new entrenched camp there. After spending a few days on the battlefield, the King of Prussian began slowly moving south in the direction of Kargow.

Upper Silesian/Bohemian Theater of Operations
In the Upper Silesian and Bohemian theater, a Prussian army under the Duke of Bevern reached Königgrätz, and occupied the city. The Austrians continued their siege operations around Neisse, and sent a raiding party north to Brieg and Breslau. The ever-resourceful Lacy commanded this detachment.


Neisse was now under serious attack, with the wet ditches slowly drying after the destruction of the sluices, and ~90,000 Austrians committed to the attack.

The most decisive moment of this week, and possibly the entire campaign so far, did not occur on the battlefield,  but in diplomatic correspondence between the Russian and Austrian courts. Intentionally or not, there was a implication that one side was shouldering more of the burden of the war effort. As a result, offense was taken on both sides, and correspondence between the two courts slackened. The Russians, on the verge of deploying a corps of reinforcements to the Austrian theater of war, redeployed those troops, regardless of the additional month of travel required to reach their new destination.  Though individual generals in both camps maintained a warm correspondence, the two armed camps now seemed less inclined to cooperate. Both were now conducting more or less individual wars against the King of Prussia, with fewer shared objectives.

The coming week would see the Austrians confronted on the battlefield by a Prussian Army for the first time, and some explosive developments at the siege of Neisse.

Background and Week 1

Week 2

If you enjoyed this post, or any of our other posts, please consider liking us on facebook, or following us on twitterConsider checking out our exclusive content on Patreon. Finally, we are dedicated to keeping Kabinettskriege ad-free. In order to assist with this, please consider supporting us via the donate button in the upper right-hand corner of the page. As always:

Thanks for Reading, 


Alex Burns